You must be signed in to read the rest of this article.
Registration on CDEWorld is free. You may also login to CDEWorld with your DentalAegis.com account.
The long-term health and stability of dental implant treatment is predicated on preventing and/or managing known risk factors for peri-implant diseases, as well as planning overall treatment with the end in mind. These two requisites are not mutually exclusive. In fact, risk factors for peri-implant diseases that have been shown to be associated with the implant restorations themselves can be controlled and/or mitigated by thoroughly pre-planning dental implant cases.1-3
Among the known risk factors for peri-implant diseases is an inability to maintain proper oral hygiene and/or access the implant area for cleaning.4 Cleaning implants is significant to plaque control, which helps to prevent the development of inflammatory cell responses. Studies indicate that peri-implantitis has developed in 48% of implants when no accessibility for cleaning was present.5
Poor prosthetic fit and implant location/angulation are also risk factors for peri-implant diseases that not only impact oral hygiene, but also directly affect peri-implant bone and soft-tissue integrity. Each of these factors has been associated with promoting accumulation of plaque on open margins, as well as exposing cement that contributes to pathogenic bacteria, which subsequently leads to inflammation and bone loss.6,7 In particular, research has demonstrated that the implant-abutment interface—and any microgaps that may be present—dictates the intensity and location of peri-implant inflammatory cell accumulation.8 Additionally, inflammatory cell accumulation below the original bone crest is significantly correlated with bone loss.8 Conversely, the absence of an implant-abutment interface (ie, associated microgap) at the bone crest has been found to be linked with reduced peri-implant inflammatory cell accumulation and minimal bone loss.9
Therefore, location and angle of implant placement requires astute assessment of existing bone to ensure the implant will be centrally secured10 and to set the foundation for long-term peri-implant bone and soft-tissue health. Interestingly, the biggest problems found with restoring implants—and which have forced clinicians to use cement-retained restorations—have been implants placed in the wrong location and implants placed at the wrong angulation.11 Improperly positioned implants (eg, too far buccally) could lead to buccal bone resorption, recession, and exposure of implant surfaces, further promoting pathogenic bacteria and the onset of peri-implant diseases.1,12
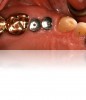
Not surprisingly, an additionally significant risk factor for peri-implant diseases that has been increasingly discussed in the literature is retained cement.13,14 Studies of implants with peri-implant disease have shown that 81% of cases were associated with cement that required removal and treatment, after which 74% of cases were absent of disease.13
Contributing to the presence of retained cement is the fact that the deeper the restorations are placed into the sulcus, the greater the possibility that retained cement will be found.14,15 Unfortunately, despite meticulous care and post-placement evaluation, not all cements are visible radiographically (eg, deep and on the buccal aspect),16,17 which underscores the need for extraoral cementation of implant-supported crowns to allow extrusion of the cement.18 In particular, researchers have found that some types of cements that are commonly used for the cementation of implant-supported prostheses have poor radiodensity and may not be detectable following radiographic examination.16,17
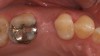
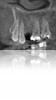
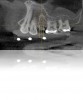
Therefore, pre-planning multiple aspects of the implant treatment, as well as the different components of the restoration, can help to ensure precise placement and angulation, as well as proper fit and connection of the implant abutment and restoration.19,20 Implant position, angulation, and restoration margin placement can be ideally planned based on preoperative analysis (eg, CBCT, planning software), and the anticipated outcomes achieved using surgical templates, guided surgery, and virtual/traditional restoration models (Figure 1 through Figure 7).21
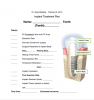
Among the considerations when pre-planning implant cases are the patient’s oral health status and hygiene habits/abilities, anticipated occlusion, level of esthetic desires (ie, which could impact selection of cement- or screw-retained restorations), and other factors. Communication with the patient—as well as with other members of the treatment team (eg, surgeon, laboratory, restorative dentist, treatment coordinator)—is essential. It is often helpful to use a start-to-finish checklist so everyone knows exactly what is needed to begin and complete the case (eg, implant placement, implant body, implant abutment, healing cap, restoration, provisional, etc), in what timeframe, and at what cost (Figure 8).
Such a checklist enables treatment components like abutments and final restorations to be pre-planned prior to actual implant placement. Their consideration, selection, and design (ie, cement-retained, screw-retained, or screwmentable) based on the overall treatment plan will help to avoid the negative sequelae that lead to peri-implant diseases, as well as disappointment and frustration when expectations aren’t met.2,3,21 Understanding a few nuances for integrating cement-retained and screw-retained implant restorations is beneficial to the treatment planning process.
Cement-Retained Implant Restoration Considerations
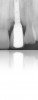
Cement-retained restorations present the greatest difficulties—restoratively speaking—when attempting to avoid failures. Yet, in the presence of angulation problems (Figure 9), nonparallel implants, and fixed partial dentures, cement-retained implant restorations are sometimes required. Therefore, due to the difficulties associated with screw-retained implant restorations in such scenarios, retaining implant restorations to underlying abutments using cementation protocol has gained in popularity.22 However, despite the frequency with which implants are restored with cement-retained restorations, residual cement at or below the implant margins continues to be a problem that has been positively associated with peri-implant diseases that, ultimately, have led to implant failure.13
Utilizing custom abutments can help to minimize the likelihood of residual cement contaminating peri-implant tissues and the amount of cement required for retaining the restoration. Creating a custom abutment enables dentists to establish the abutment/restoration margins at the ideal location—tissue level, rather than deep within the sulcus, to avoid remnants of undetectable retained cement.19
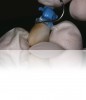
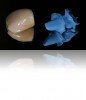
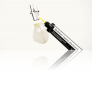
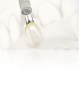
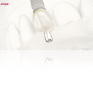
To create a custom abutment, polyvinyl siloxane (PVS) impression material is placed into the restoration (Figure 10) and allowed to set (Figure 11). Prior to removal, any spurs of impression material are removed and the margin area refined (Figure 12), with attention paid to placing the margins exactly where they should end for optimal peri-implant health and stability. Ultimately, the resulting abutment form is a replica of the internal aspect of the restoration (Figure 13).
Then, when placing the abutment/crown in the mouth, complications can be avoided by aligning the abutment to ensure the restoration does not dislodge. The restoration can be lightly primed by coating the internal aspect. When applying cement, note that due to the manner in which restorations are fabricated against implant abutments today, minimal cement is required to achieve retention (Figure 14 and Figure 15).18
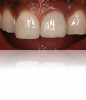
Another caveat when incorporating cement-retained implant restorations—particularly in the anterior—is establishing ideal tissue contours (eg, sulcus) and concavity during healing by placing a provisional restoration.19,20 The literature has confirmed that peri-implant soft-tissue esthetics can be sculpted and managed by placing provisional restorations.20
Screw-Retained Implant Restoration Considerations
Screw-retained implant restorations require management of the screw-access hole closure to ensure proper occlusal anatomy, prevent microleakage and bacterial infiltration, and establish ideal function and esthetics.22 Although beneficial in terms of avoiding the negative sequelae associated with intraorally cemented restorations, screw-retained implant restorations are typically challenging and demanding. However, screw-retained restorations are often favored based on retrievability.20
Over the past few years, hybrid implant abutment/restorations that combine an abutment with a crown have increasingly been used (Figure 16). The abutment aspect of a “screwmentable” component can be a stock abutment, prefabricated abutment, or custom abutment. This unit can then be cemented extraorally onto a base using an adhesive (Figure 17), after which the “screwmentable” abutment/crown complex can be screwed onto the implant (Figure 18). This eliminates the need for removing excess cement intraorally, reducing the likelihood of cement contamination to the peri-implant tissues that has been shown to cause peri-implant diseases.7,13
A benefit of “screwmentable” abutment/restorations is preparation margin placement at the gingival level. This geometry integrates well with the restoration and makes removal of excess cement easy.7 With “screwmentable” abutment/restorations, margin placement is less of a concern, because the two components are cemented extraorally, then screwed into place.
The design of this “screwmentable” abutment/restoration, however, necessitates specific location/angulation requirements, including opening of the screw-access hole away from contact points and/or occlusal function. The screw-access hole can then be filled with a composite material.
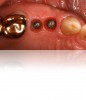
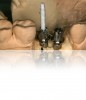
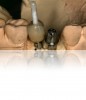
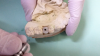
In its most simplistic form, the protocol for creating a “screwmentable” implant abutment/restoration involves the following sequence of steps: First, the correctly sized, predictable healing abutment (Figure 19 and Figure 20) is selected, and then an implant impression taken. The appropriate abutment (eg, prefabricated or custom) is then obtained (Figure 21). Gold-hue titanium and zirconia abutments produce less peri-implant soft-tissue color differences compared to the soft tissue around natural teeth than titanium or metal abutments.23 The clinician then works with the laboratory for the fabrication of the restoration, with the access holes occluded (Figure 22). Then, outside of the mouth, self-adhesive resin cement is used to connect the restoration to the abutment. Any excess cement must be thoroughly cleaned from the margin area with the unit outside of the mouth (Figure 23 and Figure 24). The abutment/restoration is screwed into place using either a screw wrench or torque wrench at the proper torque setting (Figure 25 and Figure 26), and, finally, the access hole is filled with composite (Figure 27 and Figure 28).
Conclusion
Risk factors for peri-implant diseases that have been shown to be associated with implant restorations and abutments themselves can be controlled and/or mitigated. Thoroughly pre-planning dental implant cases in terms of abutment margin placement, choosing between cement-retained or screw-retained restorations, and establishing proper implant location and angulation is essential. In particular, pre-planning can help to prevent the circumstances that contribute to an inability to clean implants, accumulation of plaque on open margins, and peri-implant soft-tissue inflammation and bone loss.
DISCLOSURE
Dr. Gillespie received an honorarium for the webinar program that was the basis of this article.
ABOUT THE AUTHOR
Greg Gillespie, DDS
Private Practice, Vancouver, Washington
REFERENCES
1. Salama H, Salama MA, Li TF, et al. Treatment planning 2000: an esthetically oriented revision of the original implant protocol. J Esthet Dent. 1997;9(2):55-67.
2. Rossi R, Morales RS, Frascaria M, et al. Planning implants in the esthetic zone using a new implant 3D navigation system. Eur J Esthet Dent. 2010;5(2):172-188.
3. Tischler M. Treatment planning implant dentistry: an overview for the general dentist. Gen Dent. 2010;58(5):368-374.
4. Lindhe J, Meyle J, Group D of European Workshop on Periodontology. Peri-implant diseases: Consensus Report of the Sixth European Workshop on Periodontology. J Clin Periodontol. 2008;35(8 suppl):282-285.
5. Serino G, Ström C. Peri-implantitis in partially edentulous patients: association with inadequate plaque control. Clin Oral Implants Res. 2009;20(2):169-174.
6. Roos-Jansåker AM, Renvert H, Lindahl C, Renvert S. Nine- to fourteen-year follow-up of implant treatment. Part III: factors associated with peri-implant lesions. J Clin Periodontol. 2006;33(4):296-301.
7. Wadhwani C, Piñeyro A, Hess T, et al. Effect of implant abutment modification on the extrusion of excess cement at the crown-abutment margin for cement-retained implant restorations. Int J Oral Maxillofac Implants. 2011;26(6):1241-1246.
8. Broggini N, McManus LM, Hermann JS, et al. Peri-implant inflammation defined by the implant-abutment interface. J Dent Res. 2006;85(5):473-478.
9. Broggini N, McManus LM, Hermann JS, et al. Persistent acute inflammation at the implant-abutment interface. J Dent Res. 2003;82(3):232-237.
10. Lin MH, Mau LP, Cochran DL, et al. Risk assessment of inferior alveolar nerve injury for immediate implant placement in the posterior mandible: a virtual implant placement study. J Dent. 2014;42(3):263-270.
11. Chee W, Jivraj S. Failures in implant dentistry. Br Dent J. 2007;202:123-129.
12. Froum SJ, Rosen PS. A proposed classification for peri-implantitis. Int J Periodontics Restorative Dent. 2012;32(5):533-540.
13. Wilson TG Jr. The positive relationship between excess cement and peri-implant disease: a prospective clinical endoscopic study. J Periodontol. 2009;80(9):1388-1392.
14. Linkevicius T, Puisys A, Vindasiute E, et al. Does residual cement around implant-supported restorations cause peri-implant disease? A retrospective case analysis. Clin Oral Implants Res. 2013;24(11):1179-1184.
15. Linkevicius T, Vindasiute E, Puisys A, et al. The influence of the cementation margin position on the amount of undetected cement. A prospective clinical study. Clin Oral Implants Res. 2013;24(1):71-76.
16. Wadhwani C, Hess T, Faber T, et al. A descriptive study of the radiographic density of implant restorative cements. J Prosthet Dent. 2010;103(5):295-302.
17. Wadhwani C, Rapoport D, La Rosa S, et al. Radiographic detection and characteristic patterns of residual excess cement associated with cement-retained implant restorations: a clinical report. J Prosthet Dent. 2012;107(3):151-157.
18. Present S, Levine RA. Techniques to control or avoid cement around implant-retained restorations. Compend Contin Educ Dent. 2013;34(6):432-437.
19. Wadhwani CP, Piñeyro AF. Implant cementation: clinical problems and solutions. Dent Today. 2012;31(1):56-62.
20. Lewis MB, Klineberg I. Prosthodontic considerations designed to optimize outcomes for single-tooth implants. A review of the literature. Aust Dent J. 2011;56(2):181-192.
21. Angelopoulos C, Aghaloo T. Imaging technology in implant diagnosis. Dent Clin North Am. 2011;55(1):141-158.
22. Wadhwani C, Piñeyro A, Avots J. An esthetic solution to the screw-retained implant restoration: introduction to the implant crown adhesive plug: clinical report. J Esthet Restor Dent. 2011;23(3):138-143.
23. Bressan E, Paniz G, Lops D, et al. Influence of abutment material on the gingival color of implant-supported all-ceramic restorations: a prospective multicenter study. Clin Oral Implants Res. 2011;22(6):631-637.